The tutorial describes the steps to authenticate an ORCID iD. It can be completed using either the public or member API. It reviews the steps to retrieve a verified ORCID iD, which can then be stored in your system’s database. There are two options: 3 legged OAuth (for long lived update permissions) and Implicit OAuth (for read-only short term permissions).
Get some client credentials
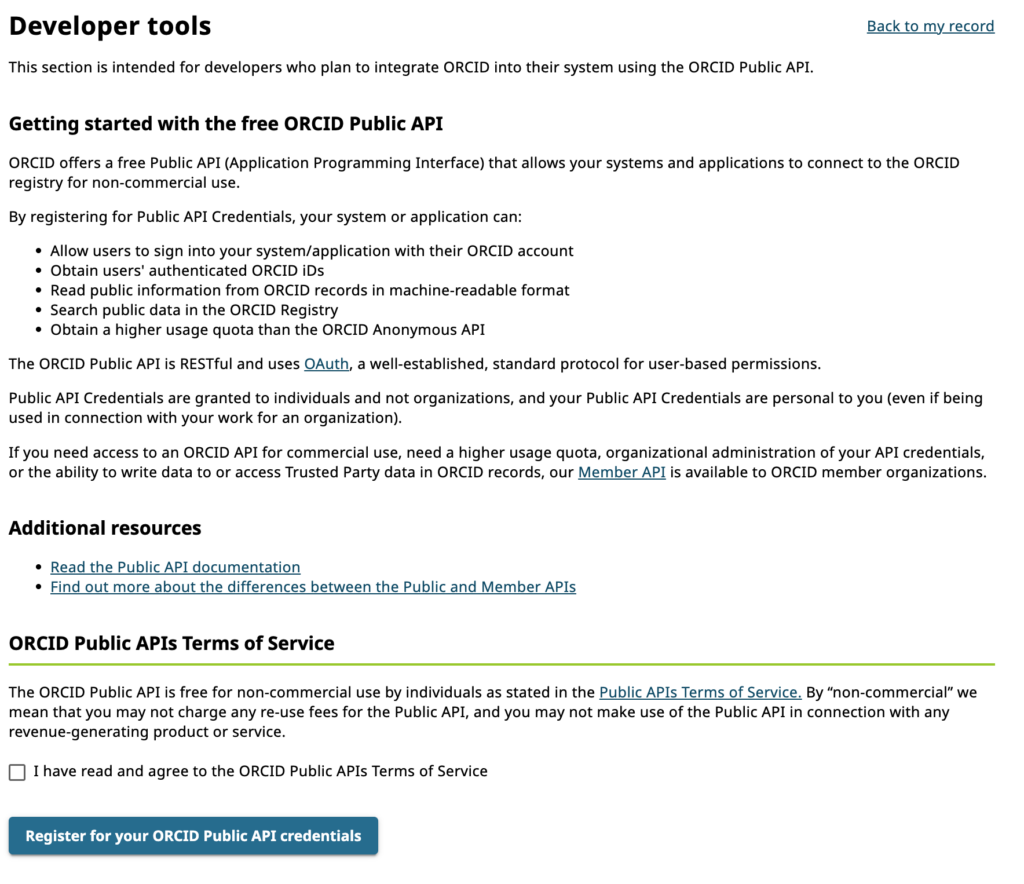
Client credentials are the username and password your application/website will use to access the ORCID API. Anyone can register for read-only Public API credentials, ORCID members can register for the member API.
We recommend that developers test the Public API in the sandbox testing server before using the production version. Below are the steps on how to register for public API credentials in both the Sandbox and Production environments.
- Sign into your ORCID record:
Production server: https://orcid.org/signin
Sandbox testing server: https://sandbox.orcid.org/signin - Click on your name in the top right hand corner
- Click Developer Tools from the menu option
Note: In order to access Developer Tools, you must verify your email address. If you have not already verified your email address, you will be prompted to do before you can register for public API credentials - Read and agree to the ‘ORCID Public APIs Terms of Service
- Click the “Register for ORCID Public API Credentials” button.
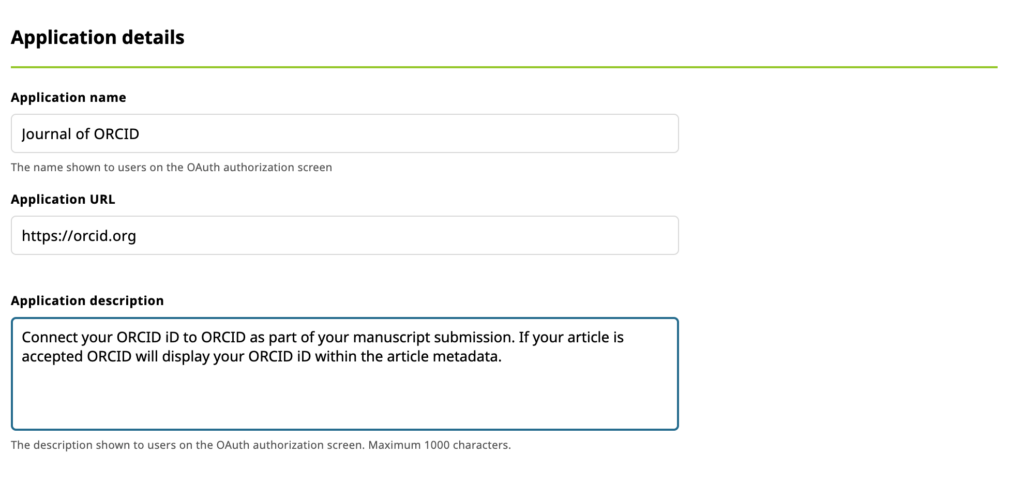
Completing the Application Details Form
- Once you have registered for your Public API Credentials you will be directed back to Developer Tools (https://orcid.org/developer-tools or https://sandbox.orcid.org/developer-tools).
- You need to complete the application details form presented to register a new application.
- Name: The name of your application. This will be displayed to users when they grant your application permission to get their ORCID iD, and it will be displayed in their Trusted organization list. We recommend using the name of your organization or service (e.g. a journal name).
- Application URL: The website the user can visit to learn more about your application. This will also be displayed in their Trusted organization list.
- Application Description: Information about the application that you are developing and how you will use the user’s ORCID iD. This will be displayed to users on the OAuth screen.
Adding Redirect URIs
Once the user has authorized your application, they will be returned to a URI that you specify. You must provide these URIs in advance or your integration users will experience an error.
- Enter your redirect URI in the box provided
- If you need to enter more than 1 redirect URI, click ‘Add another redirect URI’
Please note:
- Only HTTPS URIs are accepted in production
- Domains registered MUST exactly match the domains used, including subdomains
- Register all redirect URIs fully where possible. This is the most secure option and what we recommend. For more information about redirect URIs, please see our redirect URI FAQ
Saving your application
Once you have completed the application form and added your redirect URIs you can save your application.
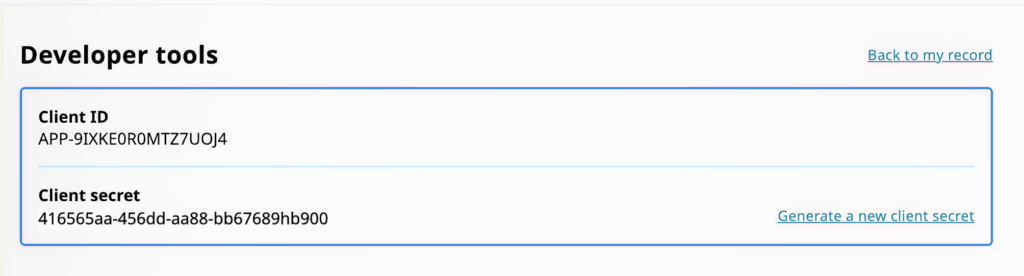
- Click ‘Save my application and generate my client ID and secret’
You will be directed back to the developer tools page which will now include your Public API client credentials
Updating your credentials
Making a change to your application information is very simple.
- Edit the relevant information and then click ‘Save application’
Use your credentials
Now that you have your credentials, it’s time to start using the ORCID Public API!
Please note that we can transfer your credentials to the member API if you become an ORCID member in the future.
You can request sandbox Member API credentials to build and test your application. These credentials allow you to make calls to the sandbox premium member API to read, write to, and update ORCID records. Access to the sandbox testing environment is freely available to anyone, even if you’re not an ORCID member organization.
Note: If you are using an ORCID certified service provider system that already supports ORCID, you do not need to register for sandbox API credentials unless you wish to try out the ORCID integration functionality within the Sandbox environment.
The sandbox lets you create test user accounts and develop your integration without having to worry about affecting data on the live (production) ORCID Registry. The sandbox behaves the same way as the production ORCID Registry with a few exceptions.
Creating a test account
In order to test the ORCID API and API calls, such as a reading and adding information to an ORCID record, you will also need to create a test ORCID record in the sandbox. This can be done through the user interface, much like on the production ORCID Registry. Go to https://sandbox.orcid.org/register and register for an account.
Mailinator email addresses
The sandbox server only sends emails to Mailinator (@mailinator.com) email addresses in order to not spam mail servers unintentionally. You will not receive a verification email or password reset notification unless you use a @mailinator.com address, and verification is required in order to make any manual edits to sandbox records. Find out more about their free to use public inboxes here.
Mailinator is an email service that has a public free service and a private paid service. For testing you can use the completely free public service. Find out more about their tiers here.
Mailinator is a third party service that is not managed or maintained by ORCID. We recommend that you review how this service works and its limitations before using these addresses.
Register your redirect URLs
Once signed in, users are sent to a URL you specify as part of registering a client.
What are redirect URIs and how are they used?
Redirect URIs are used by our OAuth authentication service as a security measure. ORCID will only send authenticating users to URIs registered by the client requesting authentication. This prevents services from impersonating each other.
Please note that only HTTPS URIs are accepted in production. You can test using HTTP URIs but you will need to register HTTPS URIs when you apply for production member API credentials.
How do we match redirect URIs?
- You MUST register subdomains as separate URIs. https://anythingelse.thirdparty.com will not work.
- Registering all redirect URIs fully, including path is encouraged, is what most third parties do and is the most secure option.
- If the client app is registered with a redirect uri that is just the host name, then any redirect uri at that host can be used. So, for example if the following redirect uri is registered: https://thirdparty.com then all of the following redirect_uris will work:
- https://thirdparty.com/oauth/callback1
- https://thirdparty.com/callback2
- https://thirdparty.com/anything-else-as-long-as-the-host-is-the-same
However, https://anythingelse.thirdparty.com will not work. You MUST register subdomains as separate URIs.
What happens if my redirect URI is incorrect?
Users sent to authenticate at ORCID with incorrect redirect URIs will see an error message similar to this: 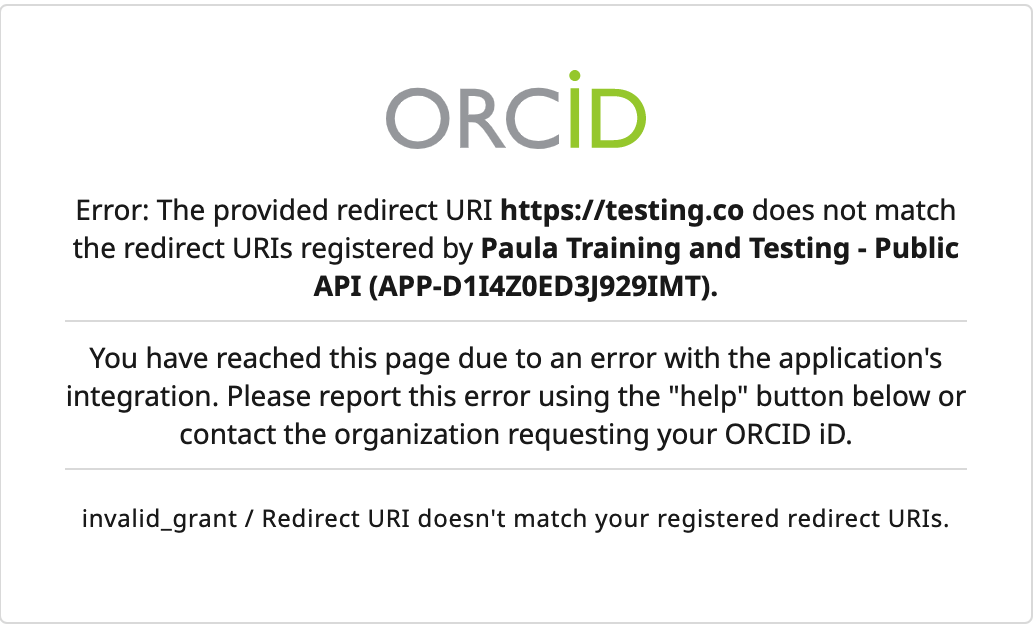
Managing redirect URIs for members
If you are using the member API and require any changes to your redirect URIs then please contact our Engagement Team
Managing redirect URIs for public clients
If you are using the public API then you will need to follow the steps below to update your list of redirect URIs that are associated with your ORCID public API client ID. You can do this by following the steps below:
- Sign in to your ORCID record
- Click your name in the right hand corner
- Select developer tools
- Click the edit pencil next to the client name
- Edit an existing redirect URI or click ‘Add another redirect URI’ edit an existing one
- Once you have made your changes you need to click the save icon

Only HTTPS URIs are accepted in production. You can test using http URIs but you will need to register HTTPS URIs when you apply for production member API credentials.
Implement OAuth
Below we explain the three ‘flavours’ of OAuth supported by ORCID. Most programming languages have OAuth and/or OpenID libraries available that make integration easier.
3-legged OAuth
This is the standard way of authenticating a user’s ORCID iD and can be used to obtain long lived update permissions alongside the authenticated ORCID iD.
ORCID integrations use “3 legged OAuth” to authenticate users and request permission to interact with their records. Any integration can ask for read permissions using the Public API. ORCID members can use the Member API to ask for update permissions. It works like this:
- You create a special link
- When clicked, the user is sent to ORCID
- ORCID asks the user to sign in
- ORCID asks the user to grant permission to your application
- ORCID sends the user back to your system with an authorization code
- Your system exchanges that code for an access token
The customized authorization URL includes your client information, as well as the ‘scopes’ that specify the specific areas of their record that you wish to access. After signing in, the user authorizes the connection with your system and is returned to your landing page along with an authorization code. This code is then used to get their ORCID iD along with an access token valid for the requested scopes.
You build your authorization link by specifying your API credentials’ client ID and associated landing page (redirect URI). You choose which permissions to ask for by setting the scope parameter.
The below example requests permission to read limited-access data on the ORCID sandbox testing server. In the real world you display this link on your website, or include it in an email when asking the user to authenticate and authorize. However, for testing purposes you can simply paste it into your web browser. Replace the bracketed data with your client information and be sure to remove the square brackets!
https://sandbox.orcid.org/oauth/authorize?client_id=[Your client ID]&response_type=code&scope=/read-limited&redirect_uri=[Your landing page]One the user has clicked the link, signed in at ORCID and granted permissions they are redirected back to your site, like this:
https://[Your landing page]?code=Q70Y3AYou should immediately exchange the authorization code for the ORCID iD and access token. The authorization code expires upon use. The request looks like this and cannot be made in a web browser, it must be made by your server.
 URL=https://sandbox.orcid.org/oauth/token
  HEADER: Accept: application/json
  HEADER: Content-Type: application/x-www-form-urlencoded
  METHOD: POST
  DATA:
    client_id=[Your client ID]
    client_secret=[Your client secret]
    grant_type=authorization_code
    code=Six-digit code
    redirect_uri=[Your landing page]
ORCID will then return the researcher’s authenticated ORCID iD and an access token in JSON format:
{"access_token":"f5af9f51-07e6-4332-8f1a-c0c11c1e3728","token_type":"bearer",
"refresh_token":"f725f747-3a65-49f6-a231-3e8944ce464d","expires_in":631138518,
"scope":"/read-limited","name":"Sofia Garcia","orcid":"0000-0001-2345-6789"}
Access tokens are long lived by default and expire 20 years after issue. The token can be used multiple times before it expires.
Use the access token
3-legged access tokens are linked to specific ORCID record. To use them, you include them in API requests you make to read or update that record.
Implicit OAuth
This is the browser-centric way of authenticating a user’s ORCID iD for use by browser based applications that do not require update permissions.
- You create a special link
- When clicked, the user is sent to ORCID
- ORCID asks the user to sign in
- ORCID asks the user to grant permission to your application
- ORCID sends the user back to your system with their ORCID iD, an access token and an id token.
- Your system extracts and stores the authenticated ORCID iD from the response.
Implicit flow
The implicit flow is designed so that clients do not need to use their secret key to initiate ORCID sign in. Security is enforced by restricting clients to their registered redirect_urls. This lower level of security means that ORCID only supports the /authenticate and openid scopes when using the implicit flow. Tokens are also short lived, with a 10 minute lifespan. This flow is recommended for client side applications which do not have access to a back end server, for example phone applications or single page javascript web-apps.https://localhost/#access_token=24c11342-f5da-4cf9-94a4-f8a72a30da00&token_type=bearer&expires_in=599&tokenVersion=1&persistent=false&id_token=eyJraWQiOiJxYS1vcmNpZC1vcmctcjlhZmw3cWY2aG2c5bmdzenU1bnQ3Z3pmMGVhNmkiLCJhbGciOiJSUzI1NiJ9.eyJhdF9oYXNoIjoiMW52bXZBbVdwaVd0Z3ZKZW1DQmVYUSIsImF1ZCI6IkFQUC02TEtJSjNJNUIxQzRZSVFQIiwic3ViIjoiMDAwMC0wMDAyLTUwNjItMjIwOSIsImF1dGhfdGltZSI6MTUwNTk4Nzg2MiwiaXNzIjoiaHR0cHM6XC9cL29yY2lkLm9yZyIsIm5hbWUiOiJNciBDcmVkaXQgTmFtZSIsImV4cCI6MTUwNTk4ODQ2MywiZ2l2ZW5fbmFtZSI6IlRvbSIsImlhdCI6MTUwNTk4Nzg2Mywibm9uY2UiOiJ3aGF0ZXZlciIsImZhbWlseV9uYW1lIjoiRGVtIiwianRpIjoiY2U0YzlmNWUtNTBkNC00ZjhiLTliYzItMmViMTI0ZDVkNmNhIn0.hhhts2-4-ibjXPW6wEsFRaNqV_A-vTz2JFloYn7mS1jzQt3xuHiSaSIiXg3rpnt1RojF_yhcvE9Xe4SOtYimxxVycpjcm8yT_-7lUSrc46UCt9qW6gV7L7KQyKDjNl23wVwIifpRD2JSnx6WbuC0GhAxB5-2ynj6EbeEEcYjAy2tNwG-wcVlnfJLyddYDe8AI_RFhq7HrY4OByA91hiYvHzZ8VzoRW1s4CTCFurA7DoyQfCbeSxdfBuDQbjAzXuZB5-jD1k3WnjqVHrof1LHEPTFV4GQV-pDRmkUwspsPYxsJyKpKWSG_ONk57E_Ba--RqEcE1ZNNDUYHXAtiRnM3wOpenID
OpenID is built on top of OAuth and offers some additional features.
OpenID Connect 1.0 is a simple identity layer on top of the OAuth 2.0 protocol. It supplements existing OAuth authentication flows and provides information about users to clients in a well described manner.
OpenID connect is a standardised way of implementing OAuth and sharing information about authenticated users. It will now be possible to configure services to use ORCID “out of the box” alongside other standards compliant OpenID connect providers. OpenID connect also provides sharable ID tokens, which are signed objects that can prove a user authenticated using ORCID at a specific time. These tokens can be used by user interface elements to maintain user sessions.
ORCID supports the Basic OpenID Provider conformance profile, which is an extension of the OAuth authorization code flow. ORCID also supports the implicit token flow for the “/authenticate” and “openid” scopes.
This means that ORCID:
- Embeds signed id tokens within token responses for authorization codes generated with the ‘openid’ scope
- Supports the implicit flow when using ‘token’ or ‘token id_token’ response_types and the ‘openid’ scope.
- Supports the ‘prompt’ and ‘nonce’ parameters for authorisation requests that include the ‘openid’ scope.
- Supports Openid Connect discovery and userinfo endpoints
- Supports the ‘amr’ field for integrators using the member API for authorisation requests that include the ‘openid’ scope. This can be used to discover if a user authenticated using two factor authentication.
Initiating an OpenID Connect authentication works the same way as a regular OAuth authentication. All that is required is that the client request the ‘openid’ scope If you are using the /authenticate scope replace it with openid, as authenticate and openid have the same authorization only one or the other should be used. If you are using any other scopes, add openid to the list of scopes requested. When the openid scope is included, the Registry will return an id_token inside the token response and grant the client permission to access the user info endpoint for that user.
ote that the ‘openid’ scope does not start with a ‘/’ like the other ORCID API scopes. This is because the ‘openid’ scope is not defined by ORCID, but instead defined by the OpenID Connect specification.
See our technical documentation for more information.
Collect authenticated iDs using ORCID’s OAuth Java Script Widget
ORCID provides a simple Java Script widget that can be used to obtain authenticated ORCID iDs using OAuth with OpenID Connect.
Please note that the widget uses implicit OAuth, so does not collect any write permissions. This means it is not suitable for member integrations that wish to update records. Please see our tutorial for Adding and Updating data on ORCID records.