Update
This post is from 2013 and may contain some outdated content. We invite you to explore the recent resources we’ve created such as video tutorials to help you use your ORCID iD successfully. A Quick Tour of the ORCID Record is a great place to start. You may also wish to see ORCID’s many benefits to researchers and the help topics available from that page.
—–
It takes about 30 seconds to register for your ORCID iD. Then what? Take a few minutes to add information that is important to distinguish you and improve the functionality of the ORCID search and link wizards, namely any of your name variations, multiple email addresses, and organizational affiliations. Then, take a few more minutes and use our wizards to import information on your existing works and link to other identifiers. Finally, to make the most of your ORCID iD, use it! Read on to learn more about managing your ORCID record.
Account settings
Log in to your ORCID account. Click on the Account Setting menu item at the top of the screen. You will be directed to a page with options for managing your personal information, email, privacy preferences, and more.
Personal information
This is really important. In a moment, we’ll show you how to import works information into your ORCID record. For the import functionality to discover all of your works, you should add all “other names” you have published under–this includes abbreviations, middle initials, different surnames, and non-Latin character sets (see below). While you’re on the personal information page, we invite you to add a biography, keywords, your country, and link to other web pages, such as your personal web page, your ResearchGate, SelectedWorks, or Academia.edu profiles, or a LinkedIn page.
.png)
Email addresses
Add all current and past email addresses. Please verify your current addresses. You can set all of these as private by clicking on the red “lock” icon, but you’ll need set one as your primary for receiving infrequent system messages from ORCID. Associating multiple email addresses does two things: you may conveniently log in with any of them, and it prevents the creation of a duplicate account by yourself or your employer.
Education and Employment
.png) Now, close the Account information window to return to your main account page. Add your Education and Employment information by clicking on the “Add Education Manually” button. Begin typing in the name of your institution, and you will be invited to select from a list. Be sure to select the top-level option (such as, Harvard University, not Harvard University Department of Astronomy). You can add department, degree, and date information. The date information is flexible but we encourage you to add at least year. Click “add to list” and you’ll return to your main account page. After updating your educational affiliation(s), add your employment affiliation(s), too.
Now, close the Account information window to return to your main account page. Add your Education and Employment information by clicking on the “Add Education Manually” button. Begin typing in the name of your institution, and you will be invited to select from a list. Be sure to select the top-level option (such as, Harvard University, not Harvard University Department of Astronomy). You can add department, degree, and date information. The date information is flexible but we encourage you to add at least year. Click “add to list” and you’ll return to your main account page. After updating your educational affiliation(s), add your employment affiliation(s), too.
In case you were wondering, this is called “Add Education Manually” because many member organizations are planning to create ORCID records for their faculty, staff, and students, and to populate educational and employment affiliations during this process.
Add works
Now that you have entered your account settings, you can start to add works. You can add works to your record in two ways: by using one or more of the Import Wizards and by adding works manually. Start with the wizards.
Import works

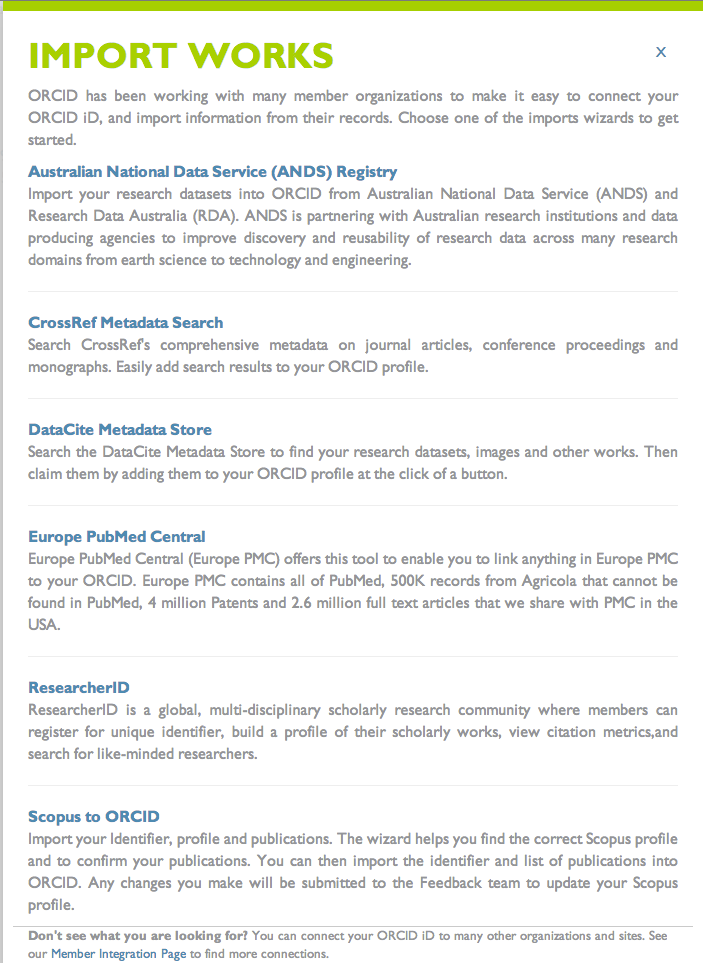
Click on the “Import Works” button on your main account page. Choose one of the Import Wizards on the page to get started. These tools vary in coverage by work type, region, and discipline, but in all cases provide a no-cost method for computer-to-computer updating of your account with works metadata (title, author list, unique ID, etc). ORCID does not store full text or data files, instead we enable connections between your ORCID iD and the unique identifiers for documents.
In addition to importing (or exporting) works information, in some cases the tools also will capture your ORCID iD and insert it into the external data record in the database you are accessing. This is how your iD is added to your existing works, and is the basis for how Scopus, Web of Science, and EuropePMC offer functionality to search their databases by ORCID iD. Many researchers report that they also identify works for which that they didn’t realize they had been listed as a co-author.
Most of you are familiar with Scopus and Researcher ID. CrossRef is a database of all journal articles that have a DOI. DataCite is a database of all datasets that have been issued a DOI. If you have published a paper or dataset in the last 10 years, you likely will find it using these Wizards.
When you click on one of the Import Wizards, you will be asked to authorize access to your ORCID record to be able to read your “Other Name” information and to write works information back to your record. After clicking authorize, the wizard kicks off a search using your Name and Other Name information, which may take a few seconds. Then, you will see a list of works that match the search criteria. Scroll through the list, select your works, and follow the instructions to add them to your ORCID record. When you return to the main page, you will see your works displayed, along with a hyperlink to the source document. Voila!
Add works manually
You may not find all of your works using the Import Wizards. For these works, take a few moments to add them manually. Click on “add work manually,” select a work category and then a work type. Add as much additional information as possible, and be sure to include an identifier type and value and/or a URL.

Manage permissions
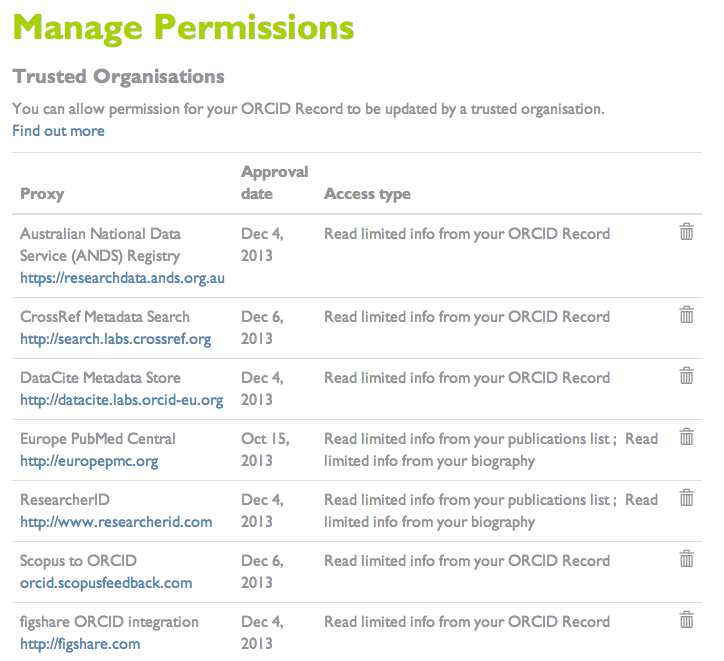
Remember those “authorize” buttons you clicked in the Imports Wizards? Return now to Account Settings and scroll down again to Manage Permissions. Here you can see the permissions you have granted to let these trusted party organizations view and access information in your ORCID record. You always control the privacy of your record, and you can change these permissions at any time.
Maintain your record
You are constantly producing new research works: publications, datasets, and more. Use your ORCID iD when these you submit your journal article, when you upload your dataset, when you apply for a grant, in your thesis, and when you start a new job. That way we can make sure to direct information on the published document back to your record, in many cases automatically. Please do return to your record to maintain your affiliations and email data.
Have questions? More information is available online.
Use and display your ORCID iD
Your ORCID iD identifies you and only you. It is also a effective tool to display and communicate your research and scholarly accomplishments–and keep other systems up to date. Include your ORCID iD in your CV or resume, web page, email signature, business cards and anywhere else you have a public profile. When including your identifier, be sure to use the full URL so that people know it is an ORCID iD and can easily navigate to your account page.
.png)
.png)
